 Dan Mahr
After upgrading to ArcGIS 10.3 last week, I went through the usual process of reapplying all of my settings and preferences in ArcMap. To expedite this process, a couple years ago I created a list of all of my preferences in ArcMap: toolbars, ArcMap Options, Geoprocessing Options, menu items, Environment Settings, and Advanced ArcMap Settings. At the suggestion of some of my colleagues, here’s the list in full.
1. Toolbars
By default, ArcMap shows two toolbars: Standard and Tools.

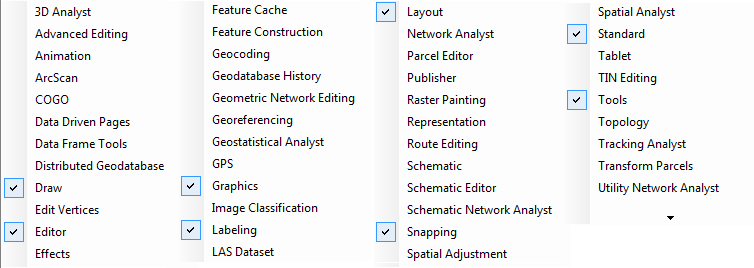
There are almost 50 other toolbars that can be added by right-clicking in the header area (or toggling in the Customize dialog).
But turning them all on at once is not a good idea. This overload of toolbars, many of which are only useful in specific contexts, is one of the reasons Microsoft moved Office to the ribbon-style UI. Esri has implemented the same ribbon in ArcGIS Pro, though I will miss some of the customization aimed at power users.
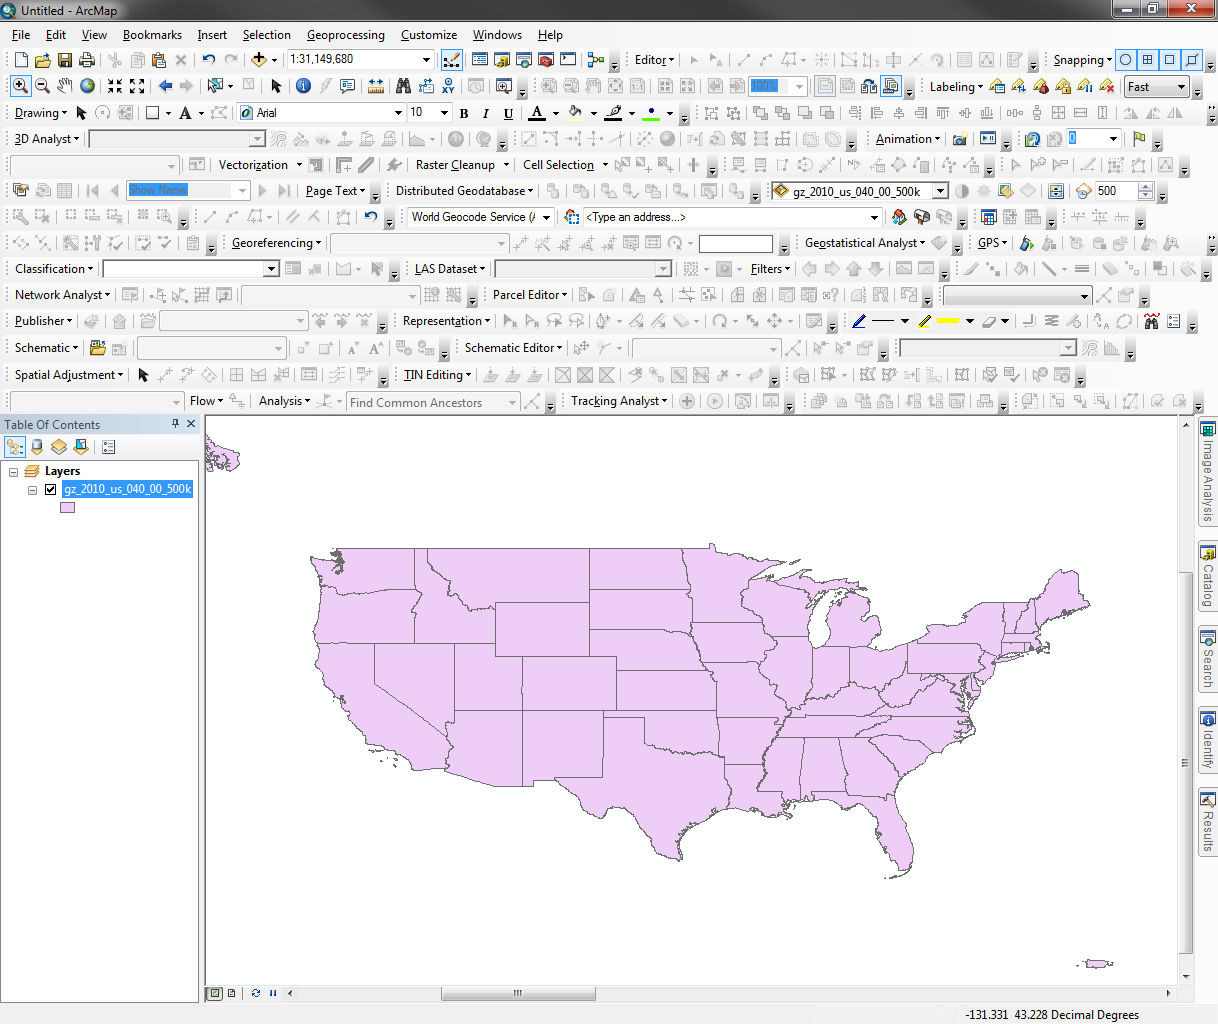
So for my day-to-day ArcMap work, I have the following toolbars enabled: Standard, Editor, and Snapping in the first row; Tools, Layout, and Labeling in the second row; and Draw and Graphics in the third row. Organizing the toolbars in these rows allows for a comfortable fit in a window that is around 1,200 pixels wide.

Customize mode also allows adding or removing specific tools on specific toolbars if further tweaks are needed.
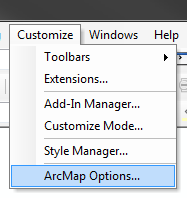
2. ArcMap Options
A lot of useful tweaks are hidden away in the ArcMap Options dialog.
General tab
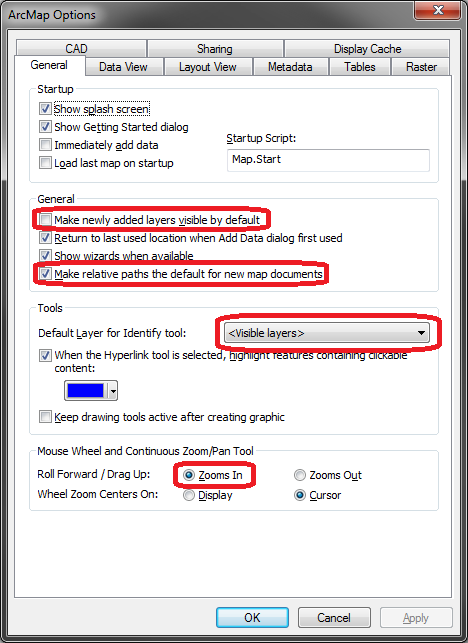
- In the General section, disable Make newly added layers visible by default. This avoids the problem of ArcMap slowly rendering huge layers (e.g. Census block groups for the entire USA) before being able to subset the data via a definition query or another tool.
- In the General section, enable Make relative paths the default for new map documents. This prevents the map document from using absolute paths for data sources, allowing for moving the folder containing the map document and data (with ArcMap closed) without seeing the dreaded red exclamation point next to all of the layers.
- In the Tools section, change Default Layer for Identify Tool from Top-most layer to Visible layers. This is usually a more useful mode when using identify, especially with complex cartography above the layer of interest.
- In the Mouse Wheel and Continuous Zoom/Pan Tool section, change Roll Forward/Drag Up from Zooms Out to Zooms In. By default, ArcMap zooms in the opposite direction of most other mapping applications, e.g. Google Earth, Google Maps.
Data View tab
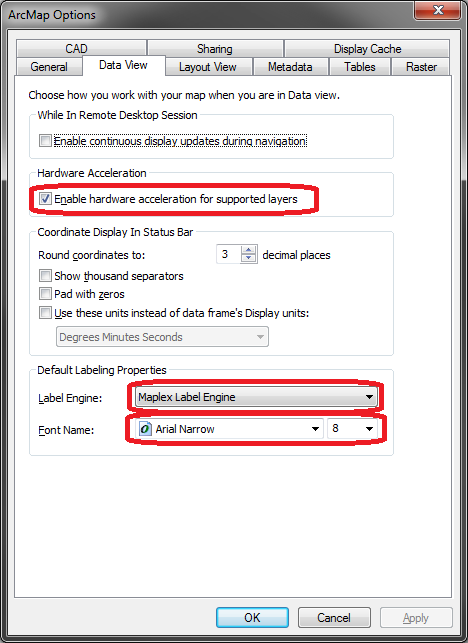
- In the Hardware Acceleration section, enable Enable hardware acceleration for supported layers. This can marginally improve the performance of some rendered layers.
- In the Default Labeling Properties section, change Label Engine to Maplex Label Engine. Maplex is now included with ArcMap and is vastly superior to the Standard Label Engine in performance and features.
- In the Default Labeling Properties section, change Font Name from Arial to Arial Narrow. The narrower width is a vast improvement in most situations.
Layout View tab
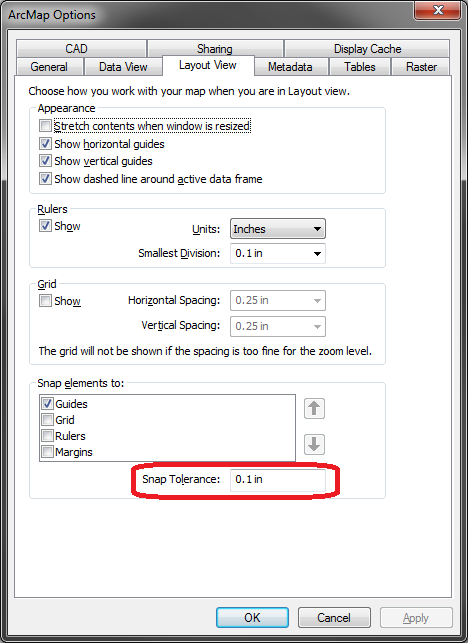
- In the Snap elements to section, change the Snap Tolerance from 0.2 in to 0.1 in. This is useful when aligning layout elements to a grid, and/or when using guides. Unfortunately, this setting only applies to the current map document in my experience.
Tables tab
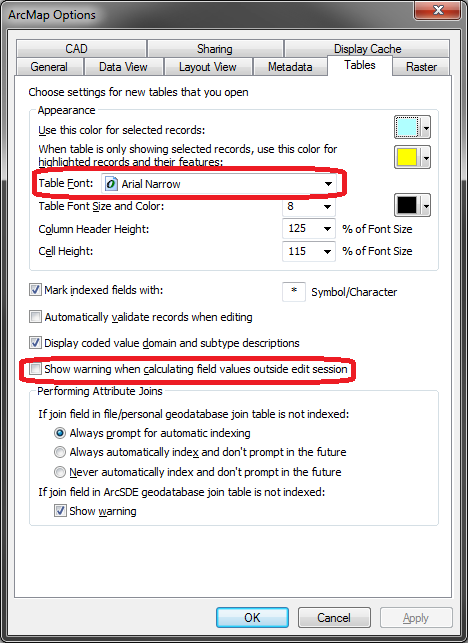
- In the Appearance section, change Table Font from Arial to Arial Narrow. As before, the narrower width is a vast improvement in most situations.
- Disable Show warning when calculating field values outside edit session. This is the same as checking the Don’t warn me again box when using Field Calculator outside of an edit session.
3. Geoprocessing Options
For some reason, ArcMap has a separate settings menu specifically for geoprocessing. I make two changes in this settings menu.

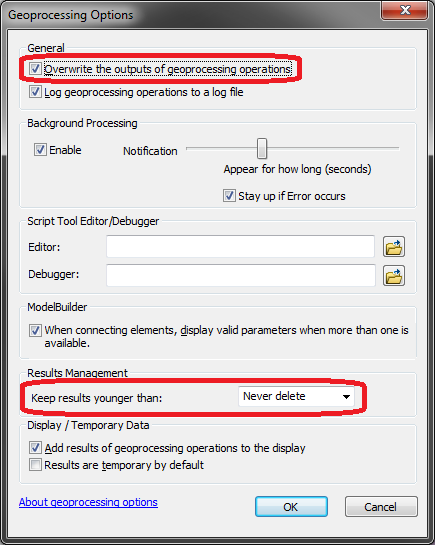
- In the General section, enable Overwrite the outputs of geoprocessing operations. This will allow rerunning geoprocessing tools and overwrite existing data without the tools throwing errors.
- In the Results Management section, set Keep results younger than to Never delete so ArcMap will show results from months or years. This is invaluable when looking at old map documents and searching for details about the geoprocessing workflow used in old projects.
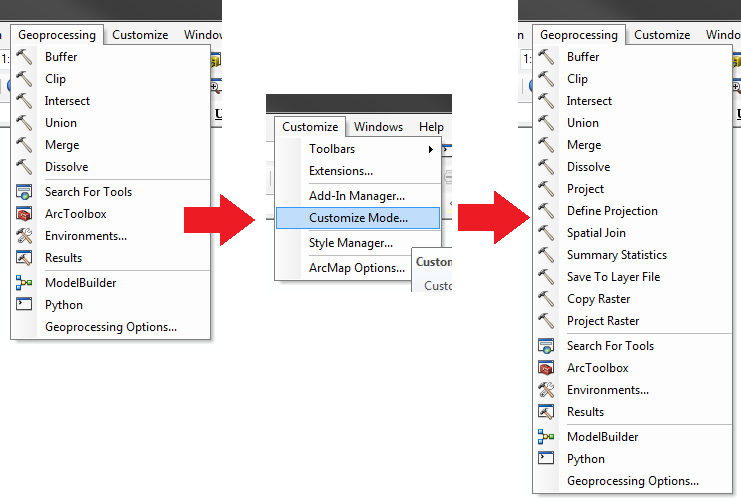
4. Geoprocessing menu items
I also add a number of frequently used tools to the Geoprocessing menu using Customize Mode. By default, this menu has Buffer, Clip, Intersect, Union, Merge, and Dissolve. I add Append, Project, Define Projection, Spatial Join, Summary Statistics, Save to Layer File, Copy Raster, and Project Raster.
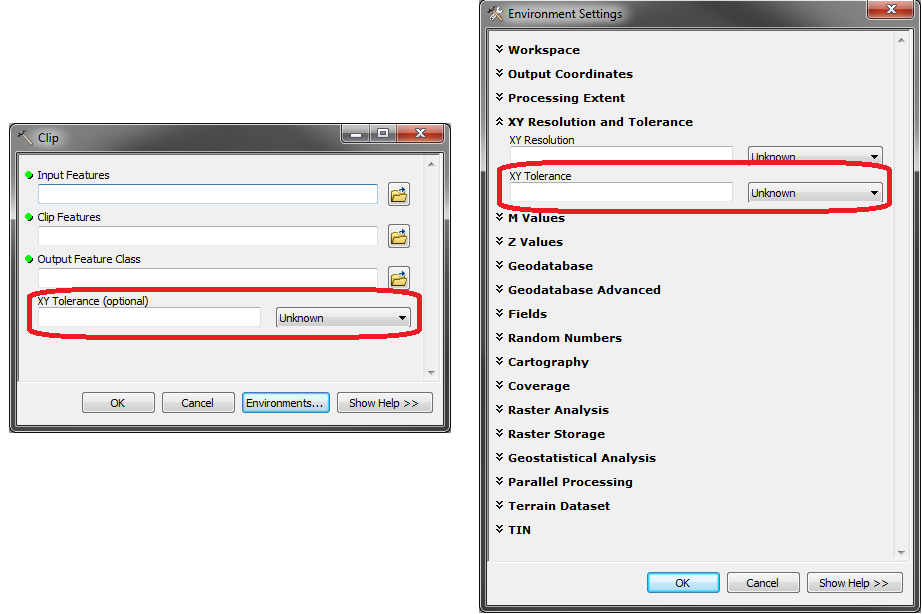
5. Geoprocessing Environments
As Esri describes them, “Geoprocessing environments settings are additional parameters that affect a tool’s results.” They can be set in a number of places: within the geoprocessing tool window, in the Environment Settings for a specific tool, in the Environment Settings for a specific model (if run within ModelBuilder), or in the Environment Settings for an entire map document. ArcMap follows a distinct hierarchy for which Environment Settings are obeyed for a given geoprocessing tool. For example, the XY Tolerance setting in the Clip tool overrides the XY Tolerance in the Environments window.
I usually only change Environment Settings for one map document at a time. However, it is possible to change the default Environment Settings in new map documents by overwriting the Normal.mxt map template in %APPDATA%\ESRI\Desktop10.3\ArcMap\Templates.
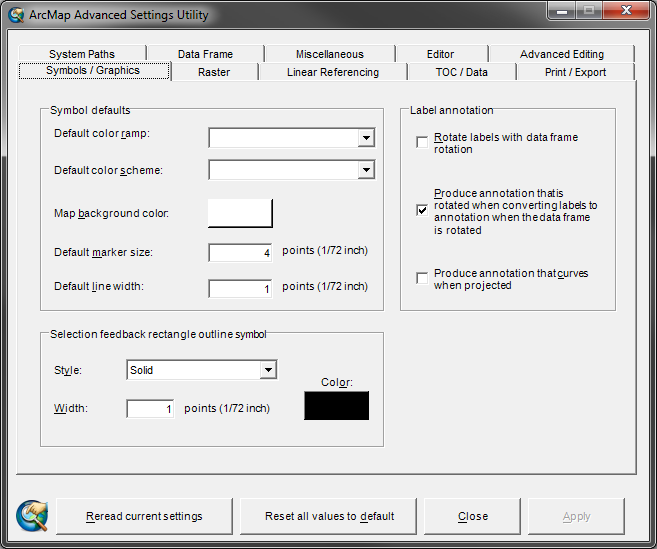
6. ArcMap Advanced Settings Utility
The ArcMap Advanced Settings Utility is a little-known UI for editing registry keys that affect the behavior of ArcMap. By default, it is located in C:\Program Files (x86)\ArcGIS\Desktop10.3\Utilities\AdvancedArcMapSettings.exe along with a PDF file documenting the different settings. I don’t usually change anything in this utility, but it can be useful in specific cases, especially with regard to the ArcMap defaults. Possible tweaks include:
- Default color ramp, color scheme, marker size, and line width for features (Symbols/Graphics tab).
- Default raster resampling mode, e.g. nearest neighbor, bilinear, cubic convolution (Raster tab).
- Default legend patch size and shape for lines and polygons (TOC/Data tab).
- Disable warnings related to layers with mismatched coordinate systems, unknown coordinate systems, or drawing errors (TOC/Data tab).
- Buffer sizes when exporting rasters and metadata, and maximum polygon vertex counts when exporting to vector types like AI, EPS, PDF, and SVG (Print/Export tab).
- Changing the default paths for styles, templates, locators, reference systems, and output temporary files (System Paths tab).
- Disable rotation of marker symbols when rotating the data frame (Data Frame tab).
- Calibration of monitor dimensions for accurate map scaling (Miscellaneous tab).
Note that most or all of these require Administrator privileges to edit.
hello Dan,
I want to change the default Arial font in drawing symbol options to Verdana and save this in the Normal.mxt so that evryone in our company use this. Is this possible? Or is this a registry key settings?
@Hein Unfortunately I don’t think what you are seeking is possible. I think it used to be possible to save this setting to an .mxt file. However, in ArcMap 10.x it is no longer possible to save new .mxt files for sharing, e.g. within a company. Very annoying…
Hi Dan, i am dealing with processing surveys from Autodesk civil 3D into an ESRI geodatabase. It involves about 15 different utilities all of which require correct rotation of valve, cap, reducer, etc symbols. Each feature requires the ‘rotation style’ to be switched to arithmetic (from geographic) and the expression [Rotation]-90 used for proper display. is there a way to change to the default of ‘geographic’ to ‘arithmetic’? This would help on the conversion back to dwg as well. many thanks!
Hey Eric, I don’t think there’s a way to save default rotation styles. However, I think this information is preserved within layer symbology. So you could create a “template” layer with the correct rotation style and expression, copy and paste this template layer multiple times in the Table of Contents, and then just change the data sources for each of the new layers using
Layer.replaceDataSource().I found this list most useful, thank you very much. One thing I did not see and cannot seem to find anywhere is how to change the “Default” font settings for legends, like you have shown and can for labels in Data View. I hate having to change the font type and size, patch type and size, & spacing for each every single time I create a new map… Am I missing something obvious here? I have ArcMap 10.4
Thanks
My preferred workaround for changing the font is to create the legend, select it, and then change the font in the dropdown on the
Drawtoolbar. This will apply that font to the entire legend, including title, layer names, headings, class labels, descriptions, etc. Some of the other properties can be set by creating your own Legend Item style within the Style Manager.nice list, and comments. thank you!
Your list is very helpful, but one quick question – is there a way to change the font size for the Identify? I can increase the font size for the table of contents and the attribute tables, but when I use Identify on something, the results box is still tiny. Thank you.
Hi,
I would like to change the default data display from Natural Breaks (Jenks) to Equal Interval. How would I do that?
Thank you!
Question on the legend-
After creating custom legend patches, how can I delete the ones I no longer want.